Introduction
This lab covers:
- Connecting GNS3 dynamips devices to physical LAN, so that we can Telnet/SSH devices from host PC/laptop.
- Installing Layer 3 switch
- An example HSRP lap to demonstrate management access from host laptop and using Layer 3 switch
Topology
The topology is as below:
- f0/0 is the device management port
- “My PC” cloud represents my laptop with Mac OS
- ESW1 is layer 3 switch using C3725, downloaded from my dropbox C3725-2014.
- R1 and R2 form HSRP with R1 as master

Connect GNS3 to Physical LAN
I was using MacOS, Windows is easier to create logical adapter. A good reference for Mac user is “How to connect your GNS3 lab to the internet in Mac OS“. In summary, we will create a logical adapter TunTap, add “Cloud”in GNS3, add “TAP” interface to the Cloud, connect TAP interface of the Cloud to GNS 3 device and configure the GNS 3 device interface IP.
Windows user will need to create a loopback adapter from Device Manager. An instruction of installing loopback adapter on Windows 10 is available here. Then add “Cloud” in GNS3, add the loopback adapter as “Ethernet” interface to the Cloud; connect the loopback interface of the Cloud to GNS3 device and configure the GNS3 device.
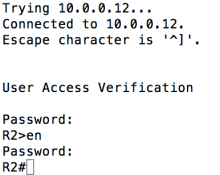
Then telnet from Mac “Terminal” to access GNS3 device as below:
Install Layer 3 Switch in GNS3
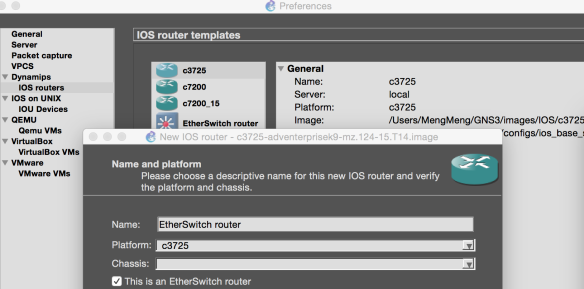
I use C3725 as Layer 3 switch. The image can be downloaded from my dropbox C3725-2014. Import it as normal dynamips device in GNS3, and tick “This is an EtherSwitch router” as below:
Then the EtherSwitch router can be selected from GNS3 switch section.
HSRP Lab
R1
R1#show run
Building configuration…
Current configuration : 1371 bytes
!
! Last configuration change at 21:13:40 UTC Sun Jun 5 2016
!
version 15.2
service timestamps debug datetime msec
service timestamps log datetime msec
!
hostname R1
!
boot-start-marker
boot-end-marker
!
enable password cisco
!
no aaa new-model
no ip icmp rate-limit unreachable
!
no ip domain lookup
ip cef
no ipv6 cef
!
!
multilink bundle-name authenticated
!
ip tcp synwait-time 5
!
interface FastEthernet0/0
ip address 10.0.0.11 255.255.255.0
speed auto
duplex auto
!
interface FastEthernet0/1
ip address 192.168.10.11 255.255.255.0
standby 1 ip 192.168.10.10
standby 1 priority 110
standby 1 preempt
ip ospf 1 area 0
speed auto
duplex auto
!
interface FastEthernet1/0
ip address 200.0.0.11 255.255.255.0
ip ospf 1 area 0
speed auto
duplex auto
!
interface FastEthernet1/1
no ip address
shutdown
speed auto
duplex auto
!
interface FastEthernet2/0
no ip address
shutdown
speed auto
duplex auto
!
interface FastEthernet2/1
no ip address
shutdown
speed auto
duplex auto
!
router ospf 1
!
ip forward-protocol nd
!
no ip http server
no ip http secure-server
!
control-plane
!
line con 0
exec-timeout 0 0
privilege level 15
logging synchronous
stopbits 1
line aux 0
exec-timeout 0 0
privilege level 15
logging synchronous
stopbits 1
line vty 0 4
password cisco
login
!
!
end
R2
R2#show run
Building configuration…
Current configuration : 1280 bytes
!
version 12.4
service timestamps debug datetime msec
service timestamps log datetime msec
no service password-encryption
!
hostname R2
!
boot-start-marker
boot-end-marker
!
enable password cisco
!
no aaa new-model
no ip icmp rate-limit unreachable
ip cef
ip tcp synwait-time 5
!
no ip domain lookup
!
multilink bundle-name authenticated
!
interface FastEthernet0/0
ip address 10.0.0.12 255.255.255.0
duplex full
!
interface FastEthernet1/0
ip address 192.168.10.12 255.255.255.0
ip ospf 1 area 0
duplex auto
speed auto
standby 1 ip 192.168.10.10
!
interface FastEthernet1/1
ip address 200.0.0.12 255.255.255.0
ip ospf 1 area 0
duplex auto
speed auto
!
interface FastEthernet2/0
no ip address
shutdown
duplex auto
speed auto
!
interface FastEthernet2/1
no ip address
shutdown
duplex auto
speed auto
!
router ospf 1
log-adjacency-changes
!
no ip http server
no ip http secure-server
!
logging alarm informational
no cdp log mismatch duplex
!
control-plane
!
gatekeeper
shutdown
!
line con 0
exec-timeout 0 0
privilege level 15
logging synchronous
stopbits 1
line aux 0
exec-timeout 0 0
privilege level 15
logging synchronous
stopbits 1
line vty 0 4
password cisco
login
!
end
ESW1
ESW1#show run
Building configuration…
Current configuration : 3331 bytes
!
version 12.4
service timestamps debug datetime msec
service timestamps log datetime msec
no service password-encryption
no service dhcp
!
hostname ESW1
!
boot-start-marker
boot-end-marker
!
enable password cisco
!
no aaa new-model
memory-size iomem 5
no ip icmp rate-limit unreachable
ip cef
!
no ip domain lookup
!
multilink bundle-name authenticated
!
macro name add_vlan
end
vlan database
vlan $v
exit
@
macro name del_vlan
end
vlan database
no vlan $v
exit
@
!
vtp file nvram:vlan.dat
archive
log config
hidekeys
!
ip tcp synwait-time 5
!
interface FastEthernet0/0
description *** Unused for Layer2 EtherSwitch ***
ip address 10.0.0.13 255.255.255.0
duplex auto
speed auto
!
interface Serial0/0
no ip address
shutdown
clock rate 2000000
!
interface FastEthernet0/1
description *** Unused for Layer2 EtherSwitch ***
no ip address
shutdown
duplex auto
speed auto
!
interface Serial0/1
no ip address
shutdown
clock rate 2000000
!
interface Serial0/2
no ip address
shutdown
clock rate 2000000
!
interface Serial0/3
no ip address
shutdown
clock rate 2000000
!
interface FastEthernet1/0
duplex full
speed 100
!
interface FastEthernet1/1
switchport mode trunk
duplex full
speed 100
!
interface FastEthernet1/2
switchport access vlan 10
duplex full
speed 100
!
interface FastEthernet1/3
switchport access vlan 10
duplex full
speed 100
!
interface FastEthernet1/4
duplex full
speed 100
!
interface FastEthernet1/5
duplex full
speed 100
!
interface FastEthernet1/6
duplex full
speed 100
!
interface FastEthernet1/7
duplex full
speed 100
!
interface FastEthernet1/8
duplex full
speed 100
!
interface FastEthernet1/9
duplex full
speed 100
!
interface FastEthernet1/10
duplex full
speed 100
!
interface FastEthernet1/11
duplex full
speed 100
!
interface FastEthernet1/12
duplex full
speed 100
!
interface FastEthernet1/13
duplex full
speed 100
!
interface FastEthernet1/14
duplex full
speed 100
!
interface FastEthernet1/15
duplex full
speed 100
!
interface Vlan1
no ip address
shutdown
!
interface Vlan10
ip address 192.168.10.9 255.255.255.0
!
ip forward-protocol nd
ip route 0.0.0.0 0.0.0.0 192.168.10.10
ip route 192.168.10.0 255.255.255.0 192.168.10.10
!
!
no ip http server
no ip http secure-server
!
no cdp log mismatch duplex
!
control-plane
!
banner exec ^C
***************************************************************
This is a normal Router with a Switch module inside (NM-16ESW)
It has been pre-configured with hard-coded speed and duplex
To create vlans use the command “vlan database” in exec mode
After creating all desired vlans use “exit” to apply the config
To view existing vlans use the command “show vlan-switch brief”
Alias(exec) : vl – “show vlan-switch brief” command
Alias(configure): va X – macro to add vlan X
Alias(configure): vd X – macro to delete vlan X
***************************************************************
^C
alias configure va macro global trace add_vlan $v
alias configure vd macro global trace del_vlan $v
alias exec vl show vlan-switch brief
!
line con 0
exec-timeout 0 0
privilege level 15
logging synchronous
line aux 0
exec-timeout 0 0
privilege level 15
logging synchronous
line vty 0 4
password cisco
login
!
!
end
R3
R3#show run
Building configuration…
Current configuration : 1111 bytes
!
! Last configuration change at 20:54:02 UTC Sun Jun 5 2016
!
version 15.2
service timestamps debug datetime msec
service timestamps log datetime msec
!
hostname R3
!
boot-start-marker
boot-end-marker
!
enable password cisco
!
no aaa new-model
no ip icmp rate-limit unreachable
!
no ip domain lookup
ip cef
no ipv6 cef
!
multilink bundle-name authenticated
!
ip tcp synwait-time 5
!
interface FastEthernet0/0
ip address 10.0.0.15 255.255.255.0
speed auto
duplex auto
!
interface FastEthernet0/1
ip address 200.0.0.15 255.255.255.0
ip ospf 1 area 0
speed auto
duplex auto
!
interface FastEthernet1/0
no ip address
shutdown
speed auto
duplex auto
!
interface FastEthernet1/1
no ip address
shutdown
speed auto
duplex auto
!
router ospf 1
!
ip forward-protocol nd
!
no ip http server
no ip http secure-server
!
control-plane
!
line con 0
exec-timeout 0 0
privilege level 15
logging synchronous
stopbits 1
line aux 0
exec-timeout 0 0
privilege level 15
logging synchronous
stopbits 1
line vty 0 4
password cisco
login
!
end

